I wasn’t exactly sure what I wanted to do for a holiday dress this year. Our family holiday celebrations are usually fairly casual, but the school that I am on the board of holds an art and music celebration, and last year I made a nice Appleton dress. At the end of November, sewist Mimi G posted on Instagram a beautiful purple jersey dress. I really liked the wrap style of the top, plus the fit of the skirt. I also find waist wraps extremely flattering, and very Kibbe Soft Classic. Then a few days later, sewist Hanna Heff posted the same dress in a glorious green jersey, and I knew what I wanted to do for my holiday dress.

I knew that Hawthorne Supply Co had a bunch of new print-in-shop holiday designs, so I searched for just the right one. I found this fun Annie Montgomery Design print, called “Twinkling Lights,” from the “Good Tidings” collection. It was perfect for the idea in my head. I quickly ordered 4 yards (my go-to length for a knee-length dress) of the organic jersey knit, the same base fabric I had used last year. I also ordered the V8825 pattern directly from Vogue, and it luckily is not out of print yet.
I read a number of reviews from people who had already made this pattern before, and knew there was some extra fabric in the bust area, so I was hoping that the bust adjustment (FBA) I would need would not be too huge. I have also read on many of the reviews that, like many of the “big 4″ patterns, the amount of wearing ease was large. Once my pattern arrived, after measuring the pieces themselves (there were no finished measurements included), I decided to start with a size 12 at the shoulders, grade to a 16 for the bust width, add 2″ through the bust for length, grade to a 14 at the waist, and back to a 12 at the hips. One reviewer mentioned they took 2” off each side seam at the hip area, and since I wanted a fitted look and the fabric is a knit with stretch, I felt comfortable starting there after measuring the flat pieces.
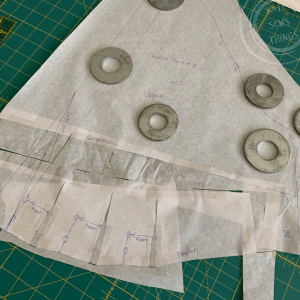
One thing I have learned this year about my body, especially when it comes to the FBA, is that while I need extra space directly over my bust apex, I do not need space or length under my arm through the side seam area. After analyzing the pattern, I felt comfortable using the slide-and-pivot method to get from the size 12 at the shoulder to the size 16 at the bust line. Then to make sure that there was enough fabric for the pleats to hit appropriately under my bust like they do in the pattern jacket drawings, I cut a large wedge from the center front across the lengthen line, almost to the side seam. I also cut up from each of the pleat lines, plus an additional line close to the side seam. I was able to add 2″ of length through that front area only by manipulating all those pleats. I then redrew the center front line to keep the start and end points the same, and trued the fold lines.


I actually had some fabric left over from last year’s holiday dress (which does not seem to be listed any longer on the Hawthorne Supply website, but the design is from Indy Bloom), so I decided to use that as my muslin. It was not enough to make the entire dress, but enough to see if the adjustments I made to the top would work. I cut it at hip length, so I was able to see how the waist and hip fit, but left off the ties, as well as the cuffs that create the bishop sleeves. I loved the fit of the front, and felt extremely successful with my manipulations. My daughter convinced me to hem the sleeves as they are, and the bottom edge, and keep it. It gives the top a Japanese-esque look that I would not have thought I would like, but for a holiday top works very well.


After making the muslin, I got started right away on the holiday dress, making no additional changes. I love this fabric so much. It took all the pleats and darts easily, and I did not even have to get my walking foot out to do the hem with the jersey stitch. The only issue I had with construction is that the front top/sleeve is a raglan, while the back/sleeve is one piece, done as a dolman style. Then the front piece wraps around the back of the neck to create the collar. What happens is there are these three pieces that come together at the base of the neck to create a triangle, and I am not sure if it was the large 5/8″ seam allowance, or not understanding how the “match the dots” should actually match, but I really struggled to get this area to look nice. Luckily when I wear my hair down it covers it, but I think I may attempt to hack the pattern to create a raglan on the back as well, which will still result in three pieces, but would then be inserted differently than how Vogue asks you to do it.

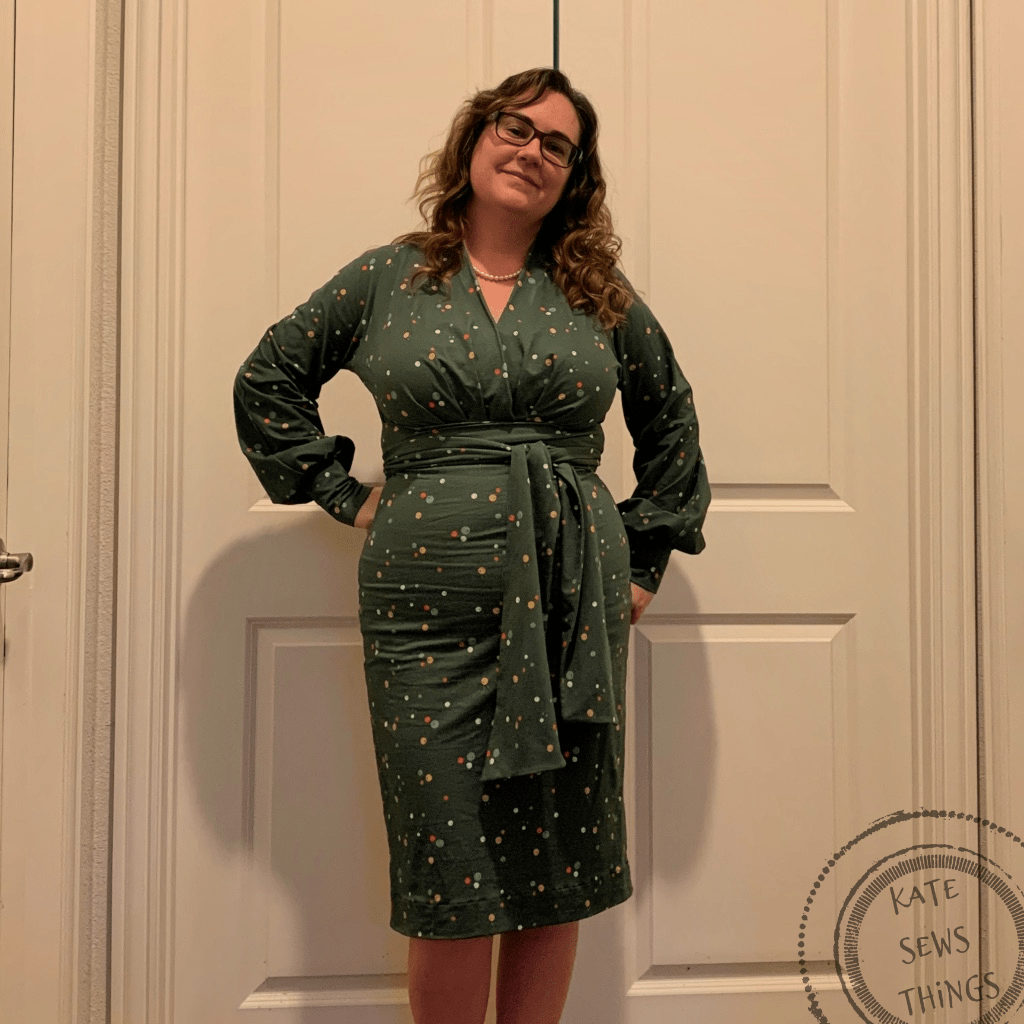
I am still trying to figure out a good place for photos with my bluetooth shutter. This is our front hallway leading to the office, which actually has a door to the laundry room on one side and a door to the powder bath on the other. Then there is a light illuminating from the top. I think it creates enough light, but the color isn’t as exact as when I take photos outside. I also had to build up a box tower to set the camera on to get the height correct here.
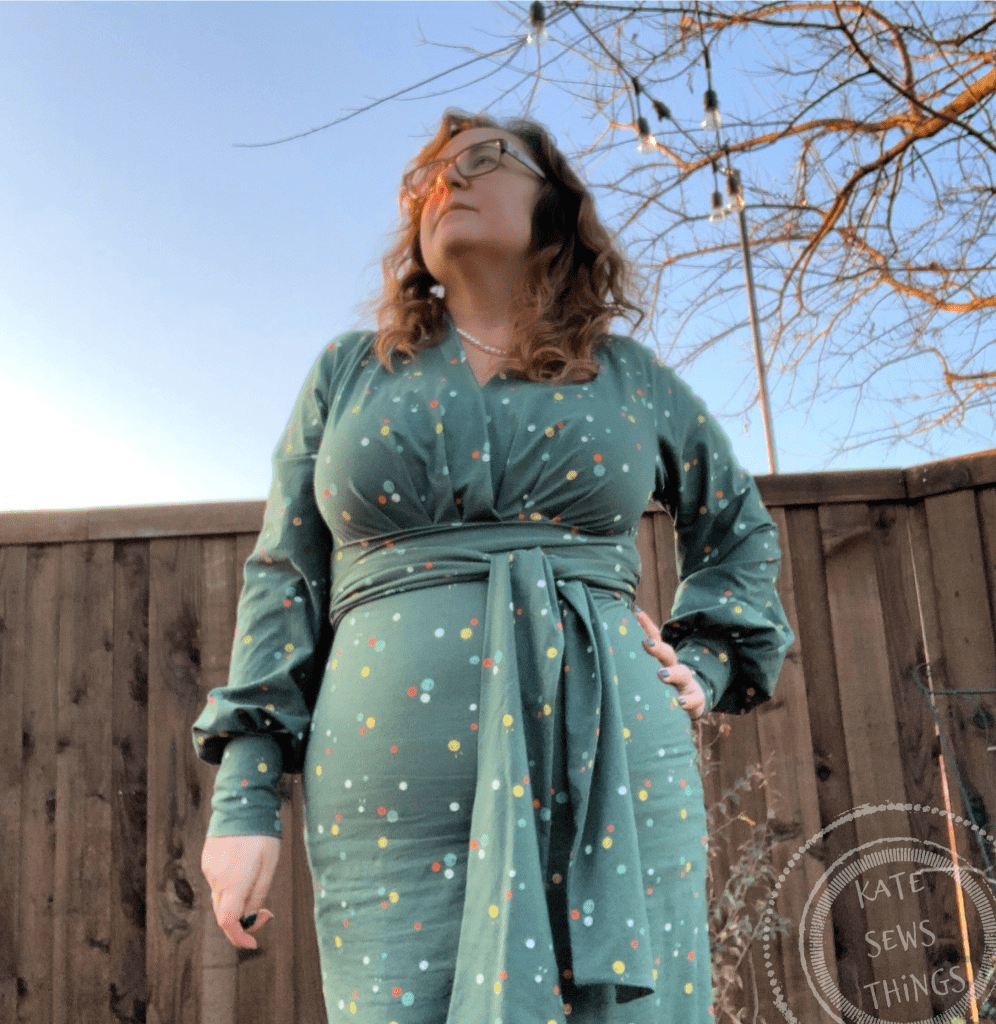

I moved outside, but it was cold. I struggled to get the angle correct, but was at least able to show the color of the fabric better. I just look super self-important trying to pose. 🤪 I should note that I cut the waist ties at the longest length, size 16, because I knew I wanted to wrap them both around the front and the back. This is also just folded over rather than tied with a double knot, but the fabric catches on itself and I did not have problems with it moving. The other change made here was that I initially cut the cuffs at a size 12, but after trying them on, I took out a full 1″ from each to get them to hug my wrists better.

After wearing both the top and the dress for a few hours, I think I could have done better with adding only 1.5″ to the length at the bust. As I move around, it does tend to gape a bit, and if you look closely at the photos of the front, it looks like there is an extra little fold of fabric where it connects to the front waist piece. I think it is due to the angle of the pleats changing, and redrawing the center front line imperfectly. I did think about attempting to rotate and pull the front in more as I attached it all, but did not want to make more of a mess, and wasn’t sure if that would cause the pleats to look too short under my bust. I just wear a camisole underneath and all is fine. It does not show unless I am bending and twisting at the same time.
I have not specifically talked much this year about #sewyourkibbe or sewing specifically #kibbesoftclassic, but that is what this dress is. It is interesting to me that I am most often drawn to things that fit into the soft classic category, even though I only learned about this fashion system a year ago. This dress fits Kibbe’s soft classic because it has waist definition, symmetry but is still soft with subdued intricacy in the pleats, and the print is soft and abstract rounded without being “cute.” It also narrows at the wrists, and has soft draping around the arm. Check out my Kibbe soft classic sewing post for more information, though I did not get very far making from that huge list of patterns I already own. 😬
Here is the official review I will be posting on Pattern Review:
Pattern Description:
This pullover dress has a fitted skirt, a fitted, pleated front that extends into the back collar, an empire waist with wrap ties from the side seams, and two-piece bishop sleeves with cuffs.
Did it look like the photo/drawing on the pattern envelope once you were done sewing with it?
Yes, though there were only drawings included, rather than tester or model photos.
Measurements/Size Used:
UB: 34″
B: 40″
W: 33″
H: 41″
Size cut: 12 at shoulder, graded to 16 at bust (with 2″ length added), 14 at waist, and 12 at hips
Were the instructions easy to follow?
The only issue I had was trying to piece the back, front sleeve, and front together at the neckline to create the triangular area of the neck/shoulder.
What did you particularly like or dislike about the pattern?
I wish both the front and back of the sleeve were raglan, and while I believe this was a style choice, I do not really understand it. I am glad that I measured out the flat pieces to know where to start for waist and hips, otherwise the dress would not have been fitted there at all.
Fabric Used:
organic cotton/spandex jersey
Pattern alterations or any design changes you made:
Did a FBA of 2″ of length through the bust, which changed the angle of the under-bust pleating
Would you sew it again? Would you recommend it to others?
Yes, this dress is extremely comfortable, and a quick sew once I got all the flat adjustments made.
Conclusion:
I really like both the look and fit of this dress. In the fabric I chose, it is the appropriate amount of fancy for the event I needed, but could easily be made more with a dressier fabric choice. I also like how my top hack turned out.
**None of the links added are affiliate links, unless linking to Amazon, but used for your convenience!


Looks great!
LikeLike
Wow, that pattern is beautiful!
LikeLike